Pages

Showing posts with label goat health. Show all posts

Sunday, February 23, 2014

A Noodleville How To: Goat Blood Draws

 
Y’all remember when I did that "How to Copper Bolus" post? At that time, I stated I was going to *try* to put up a series of “How To” post….. Well, here I am, almost 2 years later, finally getting around to another one. Sorry for the procrastination, but I wanted to be able to post LOTS of pictures and thanks to some wonderful helpers & fantastic goat models, I finally have a series of pictures to share.

Anywho….. To spare those who don’t like tons of extra reading, I’m going to outline the “How” first, and then below I’ll share my thoughts on the “WHY”. Do note, I’m not an expert, I am not a vet, and I am very well aware that my way is not the only way to do things, nor are my opinions shared by all. That’s fabulous, diversity makes the world go ‘round.. And on that nifty lil note of a disclaimer, I’ll share the Noodleville way draw blood on goats.

First, round up your supplies and get your paper work in order. For this series of blood draws, I was testing for CAE through Biotracking & a genetic disorder in Nubians called G6S through TVMDL. Gather & label your blood draw tubes. For most test, a red top tube is required and I like to use tubes that hold at least 3cc. For G6S, a purple/lavender top tube is required. Sample required is 2cc, but I always send 3cc “just in case”… I truly can’t tell you what the “just in case” is… It’s not like lil gremlins will be stealing bits of blood from my tubes leaving me short for testing once they hit the lab….. But I still feel this compulsive need to send that extra cc of blood… ANYWHO.. Let’s start with supplies…
Supply List:
IMG_20140104_134657_562
~ Clippers to buzz down the area prior to drawing blood- Not a necessity, but makes it easier for me.
~ Alcohol
~ 3cc-6cc syringes
~ 20g needles. I prefer ½” – ¾” in length.
~ Blood Collection Tubes.
~ A helper or 2
~ Goats with blood in their veins.

Getting Down to Business:
~ Shave your goat’s neck on the left of the windpipe area.
~ Clean area well with alcohol.

For my bigger girls, or when I only have the children to help me, I place them on the milk stand and have my helper stand up there behind the head gate and hold their head up and slightly to the right. Don’t pull their head too far up, nor do you want their head jerked all the way to the right… I said “slightly” as too much of either can make getting the jugular vein a lil harder. If you have a strong helper, they can simply straddle the goat and hold head in proper position. If you don’t have a goatie helper handy, place goat on stand, put on a rope sheep halter, then tie their head slightly up, in the proper position to the head gate of the milk stand. And to those awesome folks who do your blood draws all by yourself, with no milk stand, halter or helper… You’re my hero and I sooooo wanna be like you when I grow up.

Now that the goat is restrained, neck shaved and injection site cleaned VERY well with alcohol we’re ready to get down to the poking bits. Please wash your hands or wear gloves.
 IV medication diagram
You’ll feel grooves along the windpipe and just to the left of that is where the jugular vein is located. Press down very firmly with your thumb and just watch.

IMG_20140104_151656_836 blood
Honestly, I’m NOT “flipping the bird” to anyone, lol .. Pay attention to the vein popping up, and not profane gesture look-a-likes
It won’t take long if you have your thumb in the right place and apply enough pressure… Soon you’ll start to see a ropey vein popping up. I tap it quite a few times with my middle finger while holding pressure below with my thumb and once I get a good, firm “bounce” on the vein, I’m ready to draw.
Use a NEW NEEDLE & SYRINGE on every goat. Make sure there is NO AIR what so ever in your syringe.

Place needle almost parallel to the neck and go UP into the vein. Do not stab “in” as you’ll go through the vein.
IMG_20140104_151717_551
Once in place, draw back on the plunger.
IMG_20140104_151720_827

You’ll be surprised at how fast and easy the syringe fills up if you’re in the right place. It should be effortless to draw back and get a syringe full of blood…. If you’re pulling and barely getting blood, you’re in the wrong place.

Once your syringe is full, pull needle down and out at the same angle in which you inserted it and press down on the injection site for a minute or so to stop any bleeding.

Most stop bleeding very fast, so don’t have images of blood and gore running amuck in your head. If they don’t stop fast, just hold it for a lil longer and I promise it will stop soon.

Give the goat a treat, a good scratching and apology for the poking and grab the next goat.

 IMG_20130828_192933_044   IMG_20130828_192840_156
See? Treat, then Miss Tricks is a happy goat again.
Now, don’t get discouraged if it doesn’t go text book perfect. Sometimes you’ll miss the vein.  
Just take a deep breath, “bounce” the vein again until it is right, then try again (and again, and again if needed). If ya have to do it a few times, I’d grab a new needle as lots of pokes with the same needle dull it and it’s more comfy (as comfy as being poked can be anyways) to be poked by a sharp needle vs. a dull one. Make sure the head is up and positioned properly. I’ve found that if my helper pulls the head too far up or too far to the right, it makes the vein kinda skitter back “in” and I have a harder time getting it.

And, to prove that even after lots of blood draws you can still have screw ups, here is an example of things not going “text book perfect”. I pulled blood for 11 samples and had 2 “uh-ohs”… First, for whatever reason, I had a hard time getting the vein on June Bug, so she got several pokes before I got my sample (she also got several cookies to make up for it)…

Then, on Tricks, I hit the vein right, started my blood draw, and in the middle, accidently pushed the needle a lil deeper and through the vein, hence the lil pocket in the syringe with no blood. If ya do this, just slide the needle out, push air out of syringe, and then try again…Do not EVER, EVER put air in the vein. I can not stress enough how important that is.
IMG_20140104_152656_800
As soon as I get my blood in the syringe, I put it in the labeled tube. This makes sure it’s in there before it starts to clot and prevents me from getting various syringes confused and not getting the right blood into the correct tube.
IMG_20140104_160216_224
The tube has a vacuum in it, and once ya poke the needle in, it sucks the blood out all by itself.
Don’t push on the plunger….Just let the tube do its thing. Only poke your tube once and don’t screw up that vacuum. Make sure tube top where you’ll be poking is clean. I wipe mine with alcohol before I start my blood draw.
                IMG_20140104_152809_933   IMG_20140104_152811_286
Like a vacuum, the tubes suck the blood in quite fast.
               IMG_20140104_152816_409   IMG_20140104_152817_974

Now we’ll get down to packaging, labs and shipping info:

First up, for CAE and Pregnancy testing, I use Biotracking every year. Super great folks and they are always awesome about answering any questions you might have if you just give them a call. For goats, they have 2 forms: One is CAE only, one is the BioPRYN test (pregnancy).

On the pregnancy form, you have the option of adding CAE in the “added test” column, but on the CAE only form, there is no option for adding other test. So make sure you print the proper form. Here is the CAE only submission form. You can find the BioPryn pregnacy + CAE form here
IMG_20140104_124503_102

Once I get my tubes inside, I double check my submission form to ensure I have it all filled out properly and that the names on the tubes match the names and desired test I put on the forms.
Then I package them for shipping.

First, I wrap each tube in a paper towel. If the tube breaks, this provides something to absorb the blood.
IMG_20140104_161211_691
Once each tube is wrapped up nice, I bundle them all together with a rubber band so they are snug and can’t roll or clank around in the box, then I wrap with a bit of bubble wrap.
IMG_20140104_161331_477 
I put my paper towel, rubber banded, bubble wrapped bundle inside a good zip lock bag (haha, say that lil bit 5 times fast!).

This prevents any leaks just in case my samples get damaged… All this snug, leak proof packaging also prevents the folks at the post office from staring in horror at a bloody box straight out of an old time scary movie.

Lord knows I don’t want anyone thinking I’m shipping bloody body parts, mob threat style, to some poor soul in a lab…
IMG_20140104_161401_724
Since I draw my blood on weekends, I place this tidy, compact lil blood bundle in my fridge and ship out first thing Monday morning.

When it’s time to ship, I place my submission form, along with a check for the proper amount inside a separate zip lock bag, once again, to protect the paper from potential bloody accidents. Then I put my samples in, pack in a bunch of paper around it, then put my zip lock baggy with forms & payment on top and seal the box up.

IMG_20140106_083841_919

Most think you have to use pricey over night shipping for your samples which jacks the total cost of testing way up. I don’t. I simply pack in the smallest Priority/Flat Rate Priority box I can fit it in and send it. Rarely ever pay more than $7 for sample shipping.

Now, you’re supposed to write “Exempt Animal Specimen” on the outside of the box… Despite this truly being an exempt animal specimen, I’ve had a few postal employees raise an eyebrow over it… So I do write it, small, in ink, on a random place on the box, and I don’t tell them what I’m sending. It’s not their business anyways.

IMG_20140106_091524_118
Since I’m fairly new to breeding Nubians, I wanted to have them tested for the genetic disorder G6S. For this test I had to pull blood to send to TVMDL as at this time, they are the only ones who offer G6S testing. Click here for pricing & info on G6S testing through TVMDL. 

I found their website to be confusing, so I had to get a lil help on this one as I had never done it before. For this test, I collected my samples in the required purple top tubes. I do not have a credit account with this lab, so *THIS FORM* is what I printed out. This is a very generic form that can be used for several test.

   IMG_20140105_220514_440    IMG_20140105_155448_245

For G6S testing, fill out your info on top.
Circle: Caprine under the “Animal ID’s”
In the “Breed” box, write “Nubian”
In “Test Requested” write G6S and I added “(2 samples)”
In the “Specimens Submitted” I wrote what I wrote on the tubes which was #1 Rocco. #2 Rosie. Just leave the “Clinical history” and specifics like gender (in the case of both genders being sent), age and weight blank.

I did not use, fill out, or send the second page of this form. If you’re in Texas, the cost per sample is $36 plus one, $6.00 accession fee. If you are not in Texas, cost is $42 per sample and a $7.50 accession fee. You only pay one accession fee per shipment, not one on each sample submitted.
Now, I’ll touch a bit on WHY I go through all this trouble to pull blood and run these test… I raise goats because I enjoy them. They make me happy and keep me busy when life plays unfair… I love the fresh raw milk, the occasional buck kid for the freezer and I love the challenge of trying to breed a better animal with each generation. Sometimes I get it right and the next generation is an improvement on the one before it… and sometimes I get it wrong and have to go back to the drawing board, but each time I breed, I make the choice to bring a life into the world and I am responsible for that life. When anyone makes that choice, I truly feel that they should do everything in their power to ensure they are producing a healthy animal free from disease or known genetic defect.

So…. I’ll start with the WHY for the G6S. Originally, I had no intentions of breeding Nubians… But my daughter’s “ONE pet” turned into me buying another doe, then a buck, and keeping a doe kid… So, we have Nubians now. Nubians with their lovely long ears and roman noses sadly have the misfortune of a sneaky lil genetic defect called G6S which is Glucosamine-6-Sulfatase Deficiency. Thankfully, this problem is a simple recessive gene and can easily be bred out in just a few generations. Since it is a recessive gene, animals with only one copy of the gene can appear perfectly normal.

When it comes to G6S, you’ll hear 3 terms:

Affected – This is the heartbreaker. An Affected animal has 2 copies of the defective gene and has symptoms.. Affected animals tend to be smaller, are prone to heart, reproductive and immune system problems… They often show a lack of muscling and sadly they usually die by age 4, if not much sooner.
Carrier – Thankfully this animal will live a normal, healthy life. Carriers have one copy of the normal gene, one copy of the defective gene and no symptoms. The downside to having a carrier is that, as the term implies, they carry the G6S mutation and can pass it on to their offspring.
Normal – Here is the magic word you want to hear in regards to G6S. A Normal animal has two copies of the normal gene and when bred to another normal animal, will only produce normal animals.

Since I did not want it on my head that I produced G6S affected animals who are essentially sentenced to death, nor did I wish to produce carriers who just make G6S more wide spread, I chose to test. I bought a Nubian who is G6S normal by parentage, but Rocco & Rosie both had carriers behind them, so I had to test them. Thankfully, both Rocco & Rosie came back as NORMAL, which means all of my Nubians are G6S Normal by testing or parentage, and all kids I produce from these animals will also be Normal.

That is FANTASTIC news for me… Hence the smiley face I added to my test results pictured below.
g6s
Testing is pricey, but worth it… Given the expense of the test, I choose to purchase only normal animals so I won’t be footing the bill for this one again. For more detailed info I recommend “A Genetic Defect and its Management” By Dagny Vidinish . For a tidy, easy to understand summary, check out this page by Jekuthiel Nubians

Goats can be plagued with a variety of woes…. One that is quite common is CAE which is short for Caprine Arthritic Encephalitis. CAE is a viral infection in goats.

You’ll hear folks talk about hard, unproductive udders in does, or the swollen, painful knees that are very typical in symptomatic animals…. You’ll also hear stories (which are true) of CAE positive animals who live their entire lives comfortably without symptoms. Because of this, there are some out there who would write CAE off as “no big deal”…. But, if you’ve ever witnessed an infected baby die from an encephalitic seizure, seen a animal with over sized, painful knees hobble about pathetically, or seen a positive animal succumb to fatal pneumonia which is pretty common in CAE positive animals, you couldn’t possibly write it off as “no big deal”. Yes, many, if not a vast majority of infected animals will be just fine….. But, if you, as a producer, could prevent just ONE animal from suffering from the above woes, shouldn’t you?

There is no cure for CAE at this time. Thankfully though, testing has improved vastly over the years and the spread of CAE can be stopped with a bit of work. Testing, as outline above, is so easy, cheap and anyone can do it (and…. I just showed you HOW, so ya don’t have an excuse not to *wink, wink*).

I test my animals yearly, not because I am worried about positive animals, but because I feel I should do my part to set a good example… I will NEVER purchase an animal without a current, negative test, so I also do not expect anyone else to purchase animals from me without having negative, current test, from an accredited lab, in hand. I also retest all new purchases myself while they are in quarantine and recommend that others have a full round of test run on new purchases as well. 
caetest
Noodleville Farms 2014 Negative CAE Results

Depending on your herd and situation, one may want to consider testing for other goaty woes such as CL, Brucellosis, & Johnes… I have tested for CL, CAE & Johnes through WADDL in the past and have found them to be a reliable lab, so if you’re interested in more than just CAE/Pregnancy, I recommend contacting them. As a side note, if you’re wanting pregnancy test done, as well as a full smorgasbord of health testing, call Biotracking and talk to them about it…. They are more than happy to run pregnancy on your sample, then piggy back them on over to WADDL for the other test that their lab does not offer…. Pretty darn nifty eh? 

Anywho, this blog post is turning into quite the long worded fiasco, so I’ll try to wrap it up… Here’s a handy video on another method of drawing blood on goats… I personally find the syringe method easier, but thought I’d share this as another option.


One final thought from me…… Goats are complex and sometimes frustrating critters. They require lots of time, dedication and work….. Not to mention they have a knack for consuming fundage at an alarming rate at times.

Don’t let anyone convince you that disease testing is not important.

It IS important!

No, it’s not the end of the world if you have a positive animal… These things can be worked around and dealt with, but if you don’t test, you don’t know if you have anything to deal with, and knowledge my friends, is power. Knowing can help you make better decisions for future generations on your farm. The eradication of these goaty woes, one lil farm at a time, saves not only money in the long run, but quite a bit of potential heartbreak as well.

Noodleville kids are due in 2 weeks, stay tuned for baby pics galore….. When I’m not on blogger you can catch updates and pictures on my new Facebook farm page by clicking here: Noodleville Farms on Facebook - Please take a sec to stop on by, toss a “Like” my way & check out the albums of the Noodleville crew…. Lots of new pictures that I haven’t had the chance to add here yet… 
Happy Kidding Y’all!!!


Blog Summary Links

Washington Animal Disease Diagnostic Lab:

Printable General Accession Form (WADDL)

List of goat/sheep test available at WADDL

Testing Fees for WADDL health test

Texas A&M Veterinary Medical Diagnostic Laboratory:

Printable Accession Form - TVMDL

TVMDL Goat & Sheep Health Test. Testing Fees.

Biotracking:

Printable Goat/Sheep Pregnancy Submission Form

Printable CAE/OPP Submission Form.

Testing Schedules/Test Fees/Lab Information

Supplies:

Blood Collection Tubes at Jeffers Livestock Supply

Blood Collection Tubes at PBS Animal Health

Blood Collection Tubes at Valley Vet


Friday, March 16, 2012

Noodleville Updates-Both Happy & Sad

Hey there blogger world.

One of my readers brought it to my attention that I’ve neglected my blog for well over a month now……

I do apologize, I’ve kind of been in hiding I suppose… licking my wounds.

As many of you know, my dairy goats are a big part of my life and I’ve suffered some terrible losses this year.

First though, some good news. I left y’all hanging on my last post, but I’m happy to update that Sabrina had two healthy bucks and milked very well. One boy, now named Moose, was huge… 12lbs and already had visible horn buds at birth! The other lil man, Toby, was 8lbs, and had wattles.


Toby, Cou Blanc buckling
Sabrina & buckling
I evaluated my herd and made some decisions on where I want to go with it…. Sabrina, though a FABULOUS milker, didn’t fit into my plans and since I can’t maintain a large herd, I had to make cuts. She went to a great home though… 1st time dairy goat owners who needed milk and we stay in touch regularly. Sabrina is the easiest to milk, most tolerant animal I ever met and she has been just wonderful with her new family and very tolerant of everyone learning to milk on her. Toby, the lil buck with wattles, went with her as a companion and is spoiled rotten by their 5 children and they are loving the fresh milk & have been making yogurt by the gallons. Moose, that chunk, went to replace a buck who was lost to snake bite last year.

Now a bit of the bad. After deciding which way I wanted to go with my herd and breeding plans, I scraped up the funds to buy a beautiful bred doe named Astra. She was my idea of perfection and I worked so hard to get her, then drove 5 hours to pick her up…. Sadly, she came home with pregnancy toxemia and due to some inaccurate, but well meant advice, I missed the early warning signs.

We progressed to hypocalcemiaketosis so rapidly.

Days spent in the barn injecting calcium, spoon feeding her, drenching with alfalfa gruel, trying to boost her energy with sugar…Kefir for her rumen, stole cud from a healthy doe to drench into her (almost lost a thumb in the process), set up a dextrose IV, minced hay in the food processor to feed tiny bits at a time….. Every 2 hours, day & night, tending to her….
Days of sitting in the barn floor praying, begging or crying…..Small improvements that gave me hope…..only to be followed by crashes that had me watching with a desperate hopelessness….

I can’t describe the hopeless horror of watching a dream blow up in your face. Worse yet, that dream felt pain and looked at me pleadingly and I couldn’t fix it… Astra was something I thought I could never have and having this thrown in my lap was just awful.

We had to make a choice…Our hope was to pull the kids early to take the strain off her so she could recover.. But when the vet arrived, it turned into a last minute c-section to hopefully save a kid, but certainly not Astra. Instead we lost all 3. She had a beautiful cou blanc buck with wattles, and a broken chamoisee doeling…. I couldn’t have asked for more… It was exactly what I wanted and in the end I only got to hold dead kids and gave Astra an apology before we released her. Many people don’t understand…Some don’t see what all the fuss is over a goat, but I can’t explain it to folks who haven’t experienced what I have….
RIP Astra
To my goat friends & mentors… Many of you were right there with me through this and I can’t thank you enough for your support and help. Y’all kept me going and though we didn’t get the outcome we hoped for, I’m so thankful for the help & encouragement.

To those who own goats, please read Sue Reith’s HypocalcemiaKetosis information. It is valuable information.

A few lessons I took away from this that may be helpful to some….. Have your vet give you a bottle of injectable CMPK to keep on hand (Vet RX). It is much, much more effective than oral CMPK (sold OTC), and unlike oral CMPK it doesn’t have a harsh carrier that burns (oral CMPK burns the throat).

Inject 30ccs, SubQ and make sure the injections are warmed to body temperature. I microwaved a damp towel until burning hot, then wrapped my syringes in it and reheated the cloth & rewrapped as many times as needed until I got it to body temp (which goat body temp is warmer than humans)……

My vet didn’t have any CMPK injectable on hand (it’s an RX) so I had to make due with injectable calcium gluconate (sold OTC at TSC for cattle, give 30ccs, SubQ at body temp). I now have 2 bottles of CMPK injectable on hand, but if you can’t get any, at least keep calcium gluconate on hand. Sue Reith also has a recipe for homemade CMPK *here*. It won’t work as fast as injecting it, but unlike the oral CMPK you purchase, this you just make with ingredients from the vitamin isle and mix with warm water to give orally… So no caustic carrier like the oral CMPK.

If you catch the warning signs early enough, the homemade CMPK could just save your doe, but I would still urge you to try to get the injectable (or injectable calcium gluconate) on hand for emergency situations…..

These metabolic issues progress RAPIDLY and as I learned, mere minutes count. Had I caught the small warning signs sooner, I may have been able to save her...

For a doe needing sugar (ketosis), buy a $5 of injectable dextrose from TSC. It’s listed as an IV for cattle, but you can give orally and at the same time, give injections, SubQ, 30ccs at a time as often as needed. Keep several bottles on hand. I found out about this too late, but it did perk Astra up a bit.. Better than anything else we tried.

I also had to use the dextrose recently on another doe... She went off her feed after kidding and her urine had a slight "sweet" smell to it. Tested it with a ketone strip and it turned purple. Warmed up 2 syringes with 30cc each, injected the dextrose SubQ over the ribs (one shot on each side) and then drenched her with 60cc orally. Gave 30cc of CMPK injectable & repeated the dextrose in 2 hours. Then again. Next barn trip she wanted her grain. Did one more round before bed, and the following morning I tested he urine with the ketone strips and nothing showed up. So if you are quick, catch the signs early, you CAN turn around metabolic issues like ketosis & hypocalcemia. Anytime you have a doe go off feed... Check her temp!! Don't ignore it.
Many sites recommend propylene glycol for ketosis. I know it *can* help, but try a bit on your tongue. It HURTS!!! Very caustic and can burn the esophagus making them not want to eat which does even more damage........ Not to mention, something of that nature isn’t friendly to beneficial & necessary rumen flora…

I’m not knocking those who use it, but I’m happy I found an alternative. I will not touch propylene glycol, or items that contain it (Nutri-Drench) with a 10ft pole... Most especially when I found something more gentle, more easily accepted and not harsh.The injectable dextrose is YUMMY (yea, I try goat meds…) and it’s a double whammy because they can have it orally and by injection.

My nerves are still raw from the ordeal with Astra. I didn’t have her long, but when ya sleep in the barn with a goat for days, it speeds the bonding process. All the “what ifs” & “should haves” haunt me. The images from my barn that night are torture. It looked like a scene from a horror movie after it was all finished and it took me 2 days to fully clean it as I could only bear so much at once…

I thought I was made of tougher stuff, but this one really hit me hard. Knowing what I know now, I wish I would have given up sooner and saved her the pain. But I stubbornly thought that if I held on, if I did more, prayed harder, or begged more I could fix her. I’m sorry I couldn’t offer her more than my lap and tears at the end.

I will never buy another doe, on management so different than mine (she had no real calcium source in her diet prior to coming home with me) who is bred and so close to kidding. The move I think, tipped the odds against her.

Very hard lessons, but at least I learned them and I hope to never go through such an ordeal ever again.

For brighter news, Bleuberry kidded on March 5th. Weirdest labor ever. Contractions were sporadic.. Weak, then strong, then gone. Even with the help of CMPK injectable (good for hypocalcaemia and sluggish labor) and oxytocin, we could not get real contractions from her! During the process she tried to lick the skin right off me… Lick…lick..lick, then a sharp bite when a contraction hit. I’m sporting bruises from the bites!

After a while with no progress, my mom ended up fishing the kid out. Good grief, that was awful.

He didn’t want to come out and he was big. This is Bleuberry’s first kidding and she had a 12 1/2lb buckling. Poor Bleuberry has some tearing from it and I just felt awful…

Bleu's buckling... Pretty smokey color.


Add to it, she wouldn’t contract afterwards to expel the placenta. We went in and massaged the cervix, that got us some contractions, but not much. Then we kind of did this heimlich maneuver with our hands right in front of her udder and pulled sharply up…. After several rounds of this we finally got her to start expelling the placenta. She’s got a bit of udder congestion and was pretty sore, but she's mending well....

Applied Preparation H to help ease the pain from tearing (which she seemed to appreciate), did a round of antibiotics, and babied her with hot molasses water and her favorite treats. We pulled her kid at birth and he left as a bottle baby shortly after. I was just too tired to deal with him and since I wasn’t keeping him, it was better to place him sooner rather than later. Bleuberry never saw him and bonded to us instead….. Licks us and baby talks to us….Very sweet, but the down side is she screams like crazy when her baby (me) leaves the barn.

We have had a few awkward moments when I sit in the barn and she starts cleaning me, then starts nudging me towards her udder like she would a kid… Milk stand time has had it’s ups & downs, but other than the huge battle of getting her up there, we aren’t doing too bad at all. She's a first fresehener, so I cut her some slack. Hopefully in time things will go a bit more smoothly.... Pleased with the udder I’m seeing so far… It’s not going to be as nice or productive as it could have been if she would have had multiples instead of a single, but it’s well attached, high in the rear & good sized teats that are easy to milk… Still needs time, but I’m excited about the potential she’s showing.

Anywho, I am done kidding until May and am so thankful for that. I am down to Bleuberry, Casper, Comanche and Tonka after my losses & herd thinning and have to work to rebuild my Alpine herd….

Kind of feels like I’m starting at square 1 all over again, but I feel like I have a better idea of what my goals are, so hopefully this year I can work towards those goals & tuck the heart break away for a little while.

Friday, January 6, 2012

A Noodleville "How To": Copper Bolusing

I read many great blogs. I sit and read blogs more often than I post on my own…

Why?

Well, because most of them provide really useful info in an entertaining format… Throw in a healthy dose of life experiences/stories and I’m a happy reader.

My blog is mostly a place where I jot down various happenings in my life, but rarely do I post actual useable info.

Not sure how this is going to go, but I’m going to attempt to sporadically post useful “How To’s” in the future. Do note that I said sporadically…this gets me & my sporadic, hectic, unscheduled self off the hook for posting specifics at particular times.

So… Today’s “How To” is going to be about copper bolusing goats. In advance, I’ll forewarn y’all that this isn’t necessarily the gospel, it’s not the ONLY way to do things and I won’t be getting overly scientific on y’all.

Copper has been linked to fertility, parasite resistance, growth, resistance to disease, & general over all health. Most minerals do not provide adequate levels of copper to meet the needs of goats. Copper bolusing is a fantastic way to give a slow release copper supplement.

Copper deficiency can show itself in numerous ways. Also, blood samples are not a reliable way to check for copper levels in goats, the best way to check copper levels is by liver biopsy…Which can be performed during a necropsy (I personally don‘t know any vets willing to do it on a live goat, but it can be done). Handy for the goat owner to get a view on how things are going with their management… Not so handy for the goat having the necropsy.


So, here are a few outward signs of copper deficiency I can show you from my own goats (do keep in mind, these are not the only signs, just sharing a few from my herd).

Sabrina came to me looking a bit rough. Her diet had been a mineral block, heavy sweet feeds (covered in molasses, which is high in iron and high iron levels inhibit copper absorption), rationed alfalfa hay, unlimited grass hay and grazing/browse. If you look at her tail tip in this picture shortly after we brought her home you can see she has a “fish tail” with a bald tail tip and the remaining tail hair resembles a fish tail. Many goats will grow this hair back after proper mineral needs are met and maintained, some won’t. Sabrina’s has filled in some, though not fully so I’m still waiting to see if hers will fill in.


Sabrina 2011. Note the coarse coat & "fish tail"
Next up is this burnt, coppery colored hair tips. No, this is NOT sun bleaching and it was also present on the dark hairs of her legs. Her previous home had loads of trees and shade was plentiful, where as here in the desolate, dry land of Noodle, trees and natural shade are sparse. For a fair comparison, I snapped pictures of her hair almost exactly one year apart so you can look at the difference and can compare winter hair to winter hair (In her before pics which were taken January 2011, she was pregnant & due in 2 months, in her after pics, taken January 2012, she only has 21 days left before her due date). Here we have minimal shade and if anything she spent MORE time in the sun than at her previous home, yet there are no burnt colored hair tips now. Her bald tail tip has filled in some as well, though not fully. The texture of the hair is also greatly improved. A year ago it was course and brittle, now it’s soft and has a healthy shine to it.

Before Copper. January 2011 Brittle, coarse hair. Discoloration affected all dark hairs


After Copper. January 2012. Hair has no discoloration, it's sleek, smooth (and covered in hay bits)
I didn’t think about it at the time, but I should have taken pictures of her feet. Good grief they were awful!! Her previous home kept her feet trimmed every 2 months, but the overall condition of the hoof material was very poor..... Now her feet are pretty normal and don't require as much effort to trim properly, nor do they have the tendency to grow misshapen as they did when she first arrived..
Another sign of copper deficiency is a fading out of the coat, or what some folks call "ghosting". Bleuberry shows deficiency this way. She has no noticeable "fish tail" or burnt hair tips. I can't give you pictures of her as I shaved her down and don't have the "before" pics to share.... Just keep in mind, that even within one herd, animals can display deficiencies differently.

To make a copper bolus I rely on the info provided by Joyce Lazzaro at Saanendoah. Her site will give you all the scientific, technical info on her copper studies (plus show you the other signs of copper deficiency not shown here). Fantastic read, great pictures and any goat owner really should take the time to read her information.

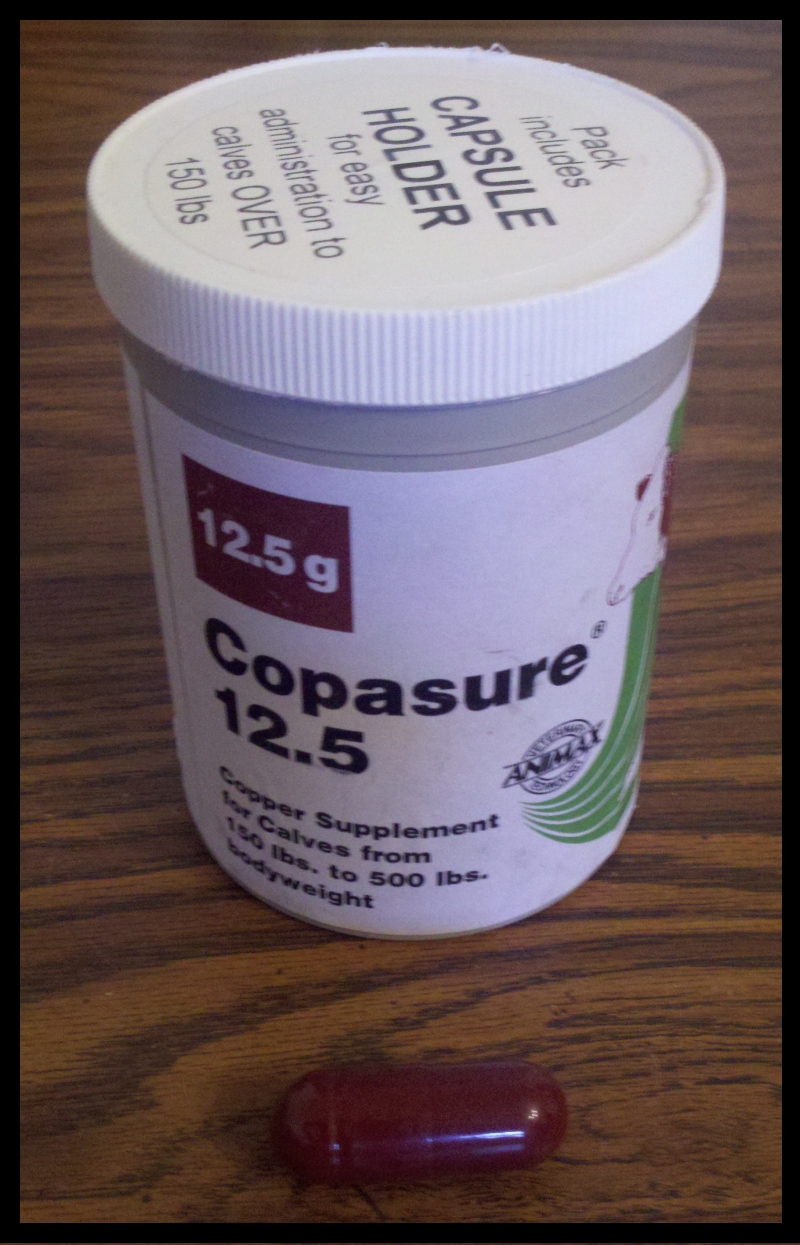
First you’ll need to buy a bottle of Copasure. I buy mine from Jeffer’s Livestock. These are copper boluses made up for cattle so you’ll need to break them down into smaller doses for goats. The $40+ may seem steep, but a little goes a long way so this should last you quite a while. I'll have to double check, but we bolused my mom's 3 miniature does, my 2 Lamanchas, and the 2 Alpine does & I think we used 3-4 of the boluses total and we typically bolus every 4 months.

Copasure & a calf sized bolus

 Using a postal scale, you weigh out the appropriate dose of copper needed for your goat. Repackage the rods into smaller gel capsules. I place the lil' foam pad from the Copasure container on my scale, zero it out, then pour on the copper rods.
Copper Oxide rods inide a bolus


I buy the smaller gel capsules at the health food store, but recently noticed Jeffer's is now carrying them, as are several other online vendors. You can buy a variety of sizes but I personally prefer to package all my boluses in one size gel capsule & fill accordingly. I dose according to the data collected by Joyce Lazzaro which is 1 gram per 22lbs.


Next is the tricky part.


Ok, ok, I confess… I seem to be the only bolusing challenged person in the whole world!!!!!!!
I was instructed to use the smallest baling gun. I tried that. I got chomped up, spit out boluses. I found it too long, bulky, and thought it did a very poor job of holding the smaller bolus (even with peanut butter!). The goal here is to get the entire bolus swallowed WHOLE. Which means, using the baling gun, you hold open the mouth, put the baling gun as far back as possible…. I’m not talking just in the mouth. I mean over the back of the tongue and into the throat. Once in position you push the plunger and shoot the bolus, whole, down their throat.

I saw videos. I had helpful folks walk me through the process and give me 10,000 pointers. Yet, while all my goaty friends were swiftly, happily bolusing their goats, I was not. I tried empty horse dewormer tubes… Still a no go. I gave up, and went for an alternative method. Hiding the rods in treats. Sabrina would swallow an orange slice with a bolus in it with no problem. My miniature doe liked marshmallows. The rest? Not so much…they spit, chomped and basically did whatever possible to thwart me with every treat imaginable.

Sadistic lil critters!

Then I found my life saver in the form of a $3 piece of plastic. 

"Quick & Easy Pill Dispenser" with 2 goat sized boluses inside
This pill gun known as "The Quick & Easy Pill Dispenser" freaking rocks!!!!!

Granted, it’s not as long as a baling gun, so I have to hold their mouth open wide and get it back there but that’s no biggey. This lil pill gun can hold 2 goat sized boluses at once and fits easily in my hand. 


Pill dispenser with loaded with 2 goat boluses
Follow up with a treat while saying “Nummy, Nummy” and you’re all done! To ensure your pill gun is longer lived, I highly recommend wrapping the barrel in several layers of duct tape or electrical tape, otherwise goat teeth will damage it after several uses.
I say “Nummy, Nummy” in a "sing-song" voice while giving all oral meds to goats & children. I think it helps the process, my kids contradict me.

Now, a few things to keep in mind. In the front, goats only have bottom teeth, no top teeth, instead on top they have a hard “dental pad“. However, in the back they have both top and bottom teeth that are SHARP! Your dog’s molars have nothing on the molars of a goat and I promise you, you do not want to get your fingers caught!

Here is a handy picture showing you the anatomy of a goat’s mouth. You can see the lower incisors in the front, the gap, then the razor sharp molars in the back.


When bolusing, I straddle the goat, grab from the top and hold firmly in that toothless gap, careful to keep my fingers away from the chomping molars. Tilt the head back, push pill gun up over the tongue and as far back as I can get it, then push the plunger, close their mouth and shove a treat in!! With Bleuberry, I'm not tall enough to straddle her, so I lock her in the milkstand to bolus her. Easy Peasy! So easy in fact, that Clayton, my 8 year old, bolused Casper without a single problem….No spit out boluses, no chomped boluses, and no missing fingers.

Now, there is some debate on whether or not bolusing via treats is as reliable as the traditional baling gun (or pet pill gun) method, I‘m not getting into all that here. I did the treat method out of desperation, but in all honesty, I prefer the pill gun and giving full, un-chewed boluses. That way I KNOW without a doubt that they received their full dose.

Here is a nifty lil diagram illustrating how the bolus actually works:


How the bolus works. Photo courtesy of Joyce Lazzaro by way of Animax Vet
Now, do keep in mind that copper is just one part in the mineral equation. Depending on your area you may have other deficiencies to worry about. For my area, and my herd, I have best results copper bolusing every 3-4 months, and I also give Bo-Se which is an injectable Vitamin E/Selenium that you can obtain with a vet RX. In addition to this I feed a high quality LOOSE mineral.

Emphasis on LOOSE mineral, as in bagged and similar to coarse sand in texture. Yes, there are mineral blocks available, but have you ever been licked by a goat? If not, come over and I’ll set Sabrina on ya.

Goats have very smooth tongues like a dog does which make it a bit more difficult to get all they need simply by licking at the block. Mineral blocks are typically full of cheap salts, so the goat needs to consume more of the block in order to meet it’s mineral needs. Problem is, the goat is attracted to the mineral block because of the salt and they typically get their fill of salt before they've come close to consuming the necessary amount of minerals. So all in all, while it’s a convenient concept, to me, a mineral block is worthless.

There are a variety of loose minerals on the market. Steer clear of “Sheep & Goat” minerals. Copper in high amounts is toxic to sheep, while studies have shown that goats need a good bit of it, so a mineral safe for sheep just isn't going to come close to meeting a goat’s copper needs. I prefer to buy dark, loose minerals…grey, brownish, earthy-toned ones. The red ones usually contain higher levels of iron and iron inhibits copper absorption. Add in that many of the red minerals have iffy amounts and sources of copper to begin with and it’s just not worth the money. My all time favorite mineral is Bluebonnet Techmaster Complete. Smells sooooo good, and has added kelp, yeast & probiotics.


Sadly, Techmaster is not available in all areas. Used it for many years before my local dealer closed up shop, so for a few years I used Cargill Right Now Onyx, a cattle mineral, and the goats did well on it. 

My loose mineral of choice. A 50lb bag last FOREVER.

To be truly scientific I have even tried a few for comparison.... And yes, by "tried", I mean I went on a taste testing spree.

I licked a mineral block, a salt block and tried a pinch of  both the Techmaster & the Cargill Right Now Onyx loose minerals. Salt block obviously was the saltiest. That mineral block was almost as salty as the pure salt block, with a hint of earthy undertones and my loose minerals were kinda gross (or should I say "very earthly"?)… I could taste a SLIGHT saltiness, but it was barely there… So given that controlled, uber scientific experiment, I have proven that my loose mineral of choice isn't chock full of cheap, filler salts.

True, I also read the labels as well, but the taste testing, IMO, made the whole thing more legit.

Also, a side note… Copper boluses are made of copper OXIDE. I see some folks grabbing bottles of copper SULFATE and just pouring who knows how much into their water troughs, and some who even have fed it via syringe. Do keep in mind that there is such a thing as “Too much of a good thing”. The copper OXIDE rods in the bolus dissolve slowly over a period of MONTHS in the digestive tract of the goat and when used properly, pose no risk of copper toxicity. The copper sulfate CAN be toxic and it is not a gradual release form of copper supplementation....

Anywho, just look how pretty Sabrina is now!

No coarse hair, no coat discoloration, no more hoof issues
.
Before her diet was heavily processed sweet feed in huge amounts (4 1/2+lbs of 16% sticky sweet feed per day), browse, a flake of alfalfa hay, mineral block and grass hay free choice. Here we switched it up a bit.

She now gets 17% protein, Standlee alfalfa pellets, good quality coastal & sudan hay, LOOSE minerals and her grain ration is a 12% protein mix of 2 parts whole oats, 1 part Purina Strategy Healthy Edge horse feed (lower protein, high forage content high fat/calcium feed) top dressed with black oil sunflower seeds or rice bran pellets…..When milking she consumes no more than 3lbs of grain per day (usually 1lb each milking) and last lactation she milked 14lbs at 2 weeks fresh. Plus she maintains great condition. So, in summary, she actually looks better on LESS feed.

The diet is made up of quality forage (alfalfa & hay), proper minerals and minimal grains. I find many folks will buy the poorest quality hay for goats, when in fact, I find my money better spent when I choose the best quality I can afford. Making the bulk of my herd’s diet alfalfa and quality hay enables me to have better production, better condition on a lot less of the concentrates (grain/pelleted rations) Not to mention the overall health of the herd is much, much better. Good forages make for a happy, healthy rumen. Proper minerals improve the overall health.


Sabrina's pregnant belly January 2012. Such a huge difference in overall condition when compared to last year. Kids due January 26th.
Many people think I’m nuts…after all they are “Just goats, they can eat anything” but the proof is in the pudding my friends! Which, BTW, not a clue how this got started, but goats do NOT eat anything, nor should it be considered ok to feed them food stuffs unsuitable for other livestock. They are actually picky eaters, preferring browse to grazing and if you watch them at the hay feeder they are constantly picking through it to find the best bite (which is why I feed alfalfa pellets.. They pick through the alfalfa hay, eat the leaves and waste a ton of stems..No waste with my alfalfa pellets). A horse will consume hay spilled on the ground and walked on, a goat won't unless that's the only thing available....

Anywho....usually the folks who think I'm nuts and advise me to use outdated methods of poor grass hay, lots of heavy sweet feeds and inadequate minerals are those with scraggly looking goats and they are the ones losing does to hypocalcemia every kidding season.

No scraggly looking goats here, and my does receive enough calcium from their alfalfa that I’ve had no losses & no hypocalcemia. Providing proper minerals i.e- copper, has also allowed me to deworm less frequently as well.....

Of course, each person has their own methods. I didn’t invent this stuff folks. I’m blessed to be advised by those who have decades of first hand experience and have been willing to help me out. In turn, I’ve tweaked things to suit my herd’s needs and my budget and all in all, I’m a happy goat owner with healthy goats.

I’ve said it once, I’ll say it again. If you have goats, I strongly urge you to read Joyce Lazzaro's Copper Studies (think I've linked to it enough in this post? lol)..
.
There are some interesting pictures of animals suffering from extreme copper deficiency as well as more in depth info than the brief review I provided.

Good stuff!